


FULL TABLE
CHOCOLATE WALNUT APPLE PIE
It’s no secret that I’m kind of a freak about pie. I go a little nuts over it and the amount of butter that makes its way through my kitchen is astounding.
And maybe a tad bit embarrassing.
But let’s be honest… life is too damn short to not eat pie often. To not enjoy every last butter-laden fork full until your eyes roll back into your head. To not let your skirts fly up over the fruit and sugar and chocolate and nuts and whatever your instincts yell at you to throw into that pie crust.
GIVE IN, LOVES.
Earlier this week I was daydreaming about pie – SHOCKER. And I was in the mood to experiment a little. One of my favorite snacks is apples dipped in melted chocolate so I started frantically writing down notes in my recipe journal about how to shove those two things into a pie shell successfully.
First things first… chocolate pie crust. YOU GUYS. How I’ve made it this far into my life without this I WILL NEVER KNOW.
I took my tried and true buttermilk pie crust and added some cocoa and magic happened. One little addition and the skies opened up before me. I am not exaggerating.
I wanted a free-form galette style deep dish pie so I decided to make this in my spring form pan but this could easily be made in a regular deep dish pie pan. (ya’ll know I want you to do whatever makes your hearts happy!) Then I decided to do a layer of my chocolate bourbon pecan piebut I subbed walnuts because I think that works with apples beautifully. And then to top it off? A simplified apple pie layer… with just a tiny squeeze of lemon juice to keep the apples from turning, a little brown sugar, cinnamon and kosher salt.
The first thing you want to do is make your chocolate pie crust and then let it rest in the fridge before you make your other filling components. (see bottom of post for an ingredient list!)
First, cut up the butter into a small dice and put in the freezer while you get everything else ready. One of the biggest keys to amazing pie crust is super cold butter! Then measure out your buttermilk and put that back in the fridge while you measure your dry ingredients.
In a medium bowl, whisk together the flour, sugar, cocoa and salt.
Add the chilled butter to the flour.
Using a pastry blender, or your fingers, work the butter into the flour until it resembles coarse sand. Then add the cold buttermilk to the bowl and use a spatula to mix the wet into the dry. It will still be a bit shaggy at this point and that’s ok! The next step is going to fix that.
Pour the mixture out onto a clean surface. Then, using the heel of your hand, start pushing the mixture away from you… smearing it onto the board and making long streaks of butter through the flour. This is the Fraiser technique.
Using a scraper, gather the dough and fold it in on itself like a letter.
Turn the pile a 1/4 turn and repeat the Fraiser step. You will do this process about 3-4 times until everything is nice and incorporated. Try and work quickly because the heat in your hands is the enemy of that cold butter we need!
At this point, you will have a lovely mound of pie dough. Yay! You did it! Now wrap the dough in plastic wrap and smoosh it into a somewhat flat/round disk. Pop it into the refrigerator for at least a couple of hours so that the dough can rest and that butter can get all nice and chilled again.
After the dough has rested, take it out of the fridge while you make the filling.
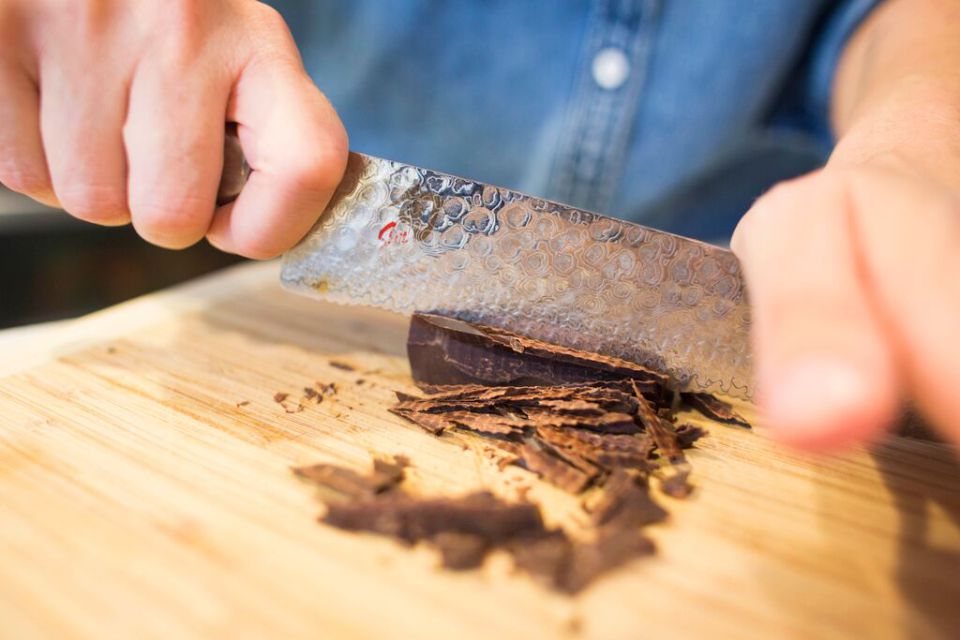
Chop 2 ounces of bittersweet chocolate – use the highest quality chocolate you can afford… it makes a huge difference. I love Scharfenberger or Guittard but use what you like!
In a small saucepan, melt the chocolate with 1/2 stick of unsalted butter, stirring until completely melted and combined. Take it off the heat and allow to cool to room temperature. Do not under any circumstances stick your face in the pan and devour the chocolate+butter mixture. If you do… just start over but don’t tell anyone what happened. Keep it in the privacy of your kitchen walls.
In a medium bowl, whisk 3 large eggs until frothy. This is the exercise that you can use to justify the caloric intake that will happen when the pie comes out of the oven. Add 1 cup sugar and 3/4 cup dark corn syrup. Then add 3 tablespoons of your favorite Bourbon. I am obsessed with the Knob Creek Smoked Maple Bourbon for baking. And drinking. {Ahem}
Add 1/4 teaspoon kosher salt, stir everything up and then add the chocolate/butter mixture.
Next, peel core and slice 4 large Granny Smith Apples. Squeeze a tiny bit of lemon juice over the apple slices just to keep them from turning brown. You only need maybe a tablespoon for the whole thing – you don’t want this to taste like lemon so don’t get all crazy with your squeezing, people.
Add 2 teaspoons cinnamon, 1 tablespoon of brown sugar and a 1/4 teaspoon kosher salt and stir together using your hands.
Now the fun part!! Let’s roll out some pie dough and get this baby into the oven for Pete’s sake! SUPER IMPORTANT TIP: spray the inside of your spring form pan with non-stick spray or brush with melted butter and line the bottom of the pan with a circle of parchment paper. If you want to be able to get this baby out of the pan when it’s done don’t skip this step. {don’t ask me how I know this}

Flour your board liberally with a equal parts flour and cocoa powder. {It was red cup season when we shot this!! Apologies to all of you loonies that are offended by the lack of snowflakes and elves on my coffee. Also: Matthew was taking WAY too long to line up his shot so I took advantage of the moment. There was definitely NOT any of that Smoked Maple Knob Creek in there. Nope}
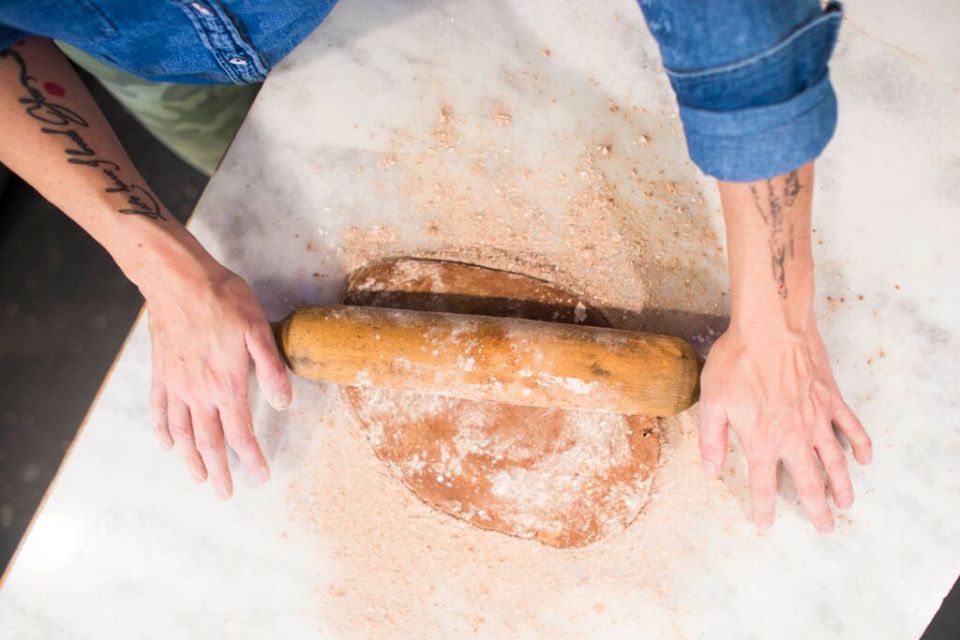
Dust the top of the dough with the same flour+cocoa mixture and then roll out into a circle that is about 4 inches larger in diameter than your spring form pan. (use a 9 inch spring form)

As you roll, lift and rotate the dough after every few rolls, dusting with flour+cocoa as needed to keep the dough from sticking to your board.
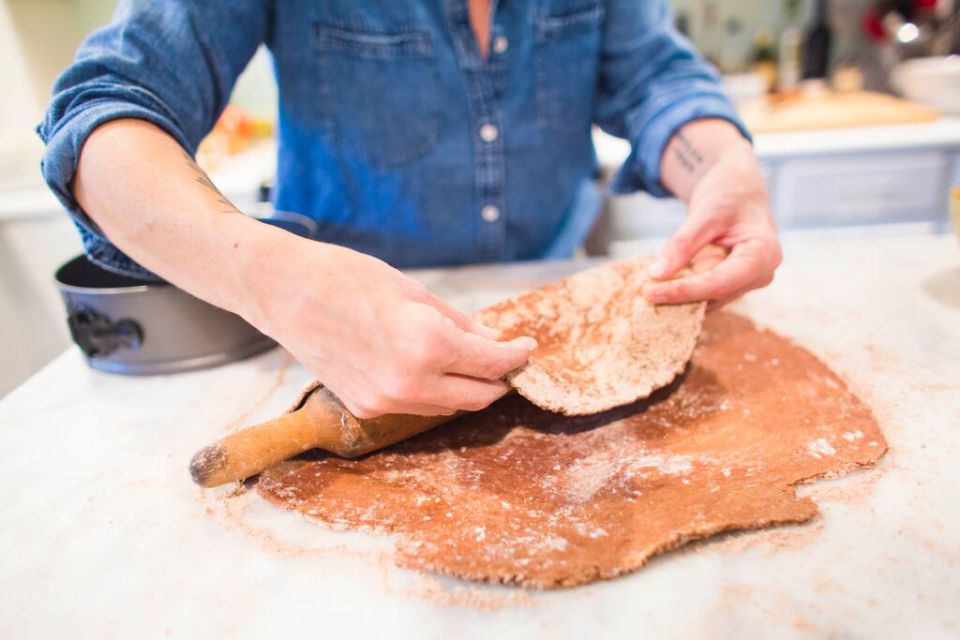
Roll the dough circle up and over your rolling pin to transfer to your spring form or pie pan.

Carefully fit the dough down into the pan and patch holes if necessary. You should have some dough draped over the edges. Fill the bottom with 1 1/2 cups of chopped walnuts.

Pour the chocolate pie filling over the walnuts. Resist the urge, yet again, to stick your face into this.
Now let’s begin layering our apples. Make sure they are all facing the same way and slightly overlapping. You’ll have one larger outer ring and then one small ring to fill in the center hole. Repeat two more times to create 3 total layers.

Fold the pie crust over the outer edge of the apples… it won’t be perfect. It will be rustic and lovely and wonderful.
Sprinkle some flaked sea salt or coarse kosher salt (just please NOT table salt) over the top if you have it. Place the spring form pan on a baking sheet lined with parchment paper and bake at 375 degrees for about 90 minutes. (I test my pie with an instant read thermometer and take it out when it reaches 200 degrees internal temperature)
Remove from the oven and allow to cool for an hour or so before you attempt to release the pie from the spring form pan.

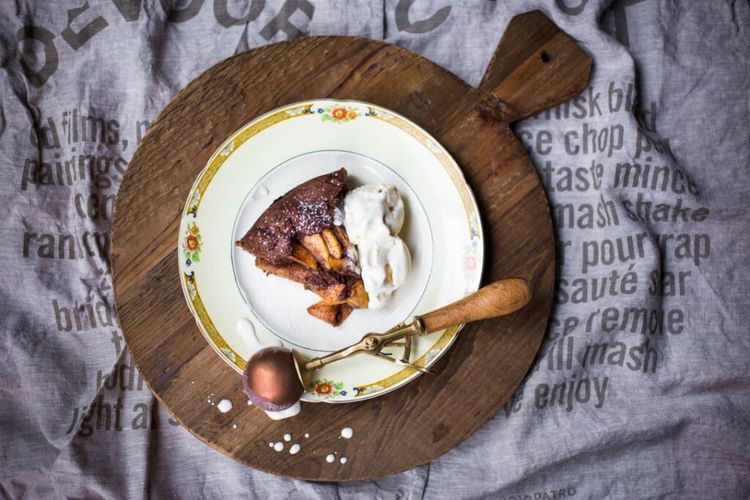
The combination of the bittersweet and flaky pie crust + smokey and sweet chocolate walnut layer + traditional apple pie is worth the work, I promise.
I would LOVE to hear what is on your go-to dessert making list these days! I hope it will now include this beauty… click the comment tab and talk to me!
All photos copyright Matthew Ray.
Wood cutting board and vintage ice cream scoop from Pressed Cotton.
RELATED POSTS


Listen. I am a diehard chocolate lover. Chocolate chip cookies are my thing and I rarely stray. Except for these beautiful little sweet/tart pillowy cookies that have my heart forever and always.
They are SO DANG GOOD. And you should go right ahead and make them right now. After all, we are – every last one of us – in the throws of our quarantine baking marathons and I’m here to help you out.